

An Ultrasound Probe (also commonly known as Ultrasound Transducer) is a type of device which emits sound waves into the human body tissues. Upon the contact of the waves on the tissue, the transducers/ probes receive the reflected portion of waves.
Never ever bypass any minute defects or faults in your Ultrasound probe as it could ultimately lead to misdiagnosis, inaccurate measurement, cross-contamination, clinical and health safety issues in the patients.
Facing difficulty in identifying your Ultrasound Probe defects/ damage and its associated solutions? Need some clarity on ultrasound probe repair or replacement?
Standard Probe Nomenclature
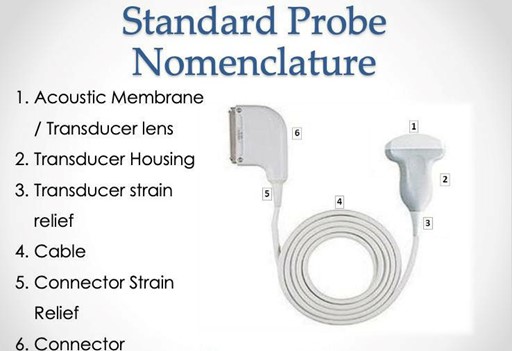
The essential components of Ultrasound Transducers are:
Acoustic Lens: The lens is primarily used to focus the ultrasound beam at a specific target. It provides protection for the probe from external damages.
Transducer Housing: The housing layer consists of a Piezoelectric crystal element, electrode placements, acoustic absorber, and matching layer. The transducer housing serves as an electrical insulator.
Piezoelectric Element: The generation of ultrasound waves are done using the Ceramic crystals known as Piezoelectric ceramic crystal. On the application of electric current, these crystals start vibrating to produce ultrasound waves. These crystals convert electric current into ultrasound waves. On vice versa, when the reflected waves hit the crystal, the mechanical vibrations are converted into electric current that is directed to the transducer.
Positive and Ground Electrodes: Ground Electrode and Signal Electrode are situated on the front and back sides of the crystal element respectively. Basically, they are connected to the ultrasound machine which establishes an electric connection.
Acoustic Absorber: Acts as the backing block that aids in the absorption of the ultrasound wave propagated backward from the Piezoelectric crystal element. In addition, the backing block must have a high attenuation factor so that the ultrasonic waves are absorbed totally without reflecting back to the housing.
Acoustic Matching Layer: This layer serves as an inference between the body tissue and the wave emitting PZTs. It helps in the facilitation of the ultrasound energy transfer through impedance matching.

Ultrasound probe cross-sectional view
Ultrasound Transducer’s defects and solutions:
Here’s the handy guide for you to sort out your probe issues with our proposed solutions. Inspecting your ultrasound transducer for a couple of issues is the first and foremost stage.
Firstly, it is critical to inspect the following components to spot the relevant defect.
Look out for
- Holes, Cuts, Swelling in Acoustic Lens/ Membrane
- Damage in the Piezoelectric crystal
- Any Cracks on the transducer housing assembly
- Condition of Strain Relief on both ends
- The discrepancy in the Cable condition
- Swelling of the matching layer
- Pin damages in the Machine end Connector
- Probe oil leakage
- Faulty Scanning Images
1. Acoustic Membrane/ Lens
In many cases, there are high chances of the probe’s acoustic membrane lens appearing to be a dried-out lens. The reason behind a dried-out lens is due to the application of improper gel, perfume gels, or fluids containing alcohols which are unsuitable for cleaning the transducer lens. Opt for an ideal, proper gel that solves the issue.
On the other hand, several problems such as holes, swelling, discoloration, lens thickness due to improper repair, air gaps or bubbles, scratches, and cuts on the acoustic membrane or lens are commonly found. In such problematic situations, the optimal solution is to replace the lens. Sometimes, long-term usage of the probe leads to lens wear which needs to be replaced.

Ultrasound probe acoustic membrane holes, cut

Ultrasound probe membrane swelling or air gap

Dried out acoustic membrane

Lens issue scanning
- Damage in the crystals
The damage in the probe crystals is probably caused by dropping the probe or hitting the probe against objects or usual wear and tear.
The ultimate consequence would be a dropout in the image (black lines- loss of the pattern waves) since the crystal would be in a weak or dead state in receiving and sending the ultrasound waves. In such instances, replacing the damaged crystals can avoid patient misdiagnosis

Transducer issue scanning images
3. Cracks on the Transducer Housing
The cracks on the transducer housing assembly are caused mostly due to the fact that the ultrasound probe has been dropped, or forcibly damaged by other objects.
Another defect that arises in the transducer housing assembly is the housing gap. It is caused by the separation of the seam line from the nose cone that is subjected to be the site of fluid Gel ingress.

Ultrasound transducer Housing crack
 Housing crack
- Strain Relief Condition on both ends
Strain relief is the point of contact where the cable and ultrasound probe is connected. Sometimes, a cracked strain relief or strain relief separation from both ends could be due to missed or loose connections which is usually evident.
Additionally, such strain relief conditions on both ends can lead to noise problems that impact the diagnosis. Connecting and reconnecting the ultrasound probe can resolve the loose strain relief connection.
Immediate intervention of repairing those parts is necessary so as to minimize the sensitive internal parts and hefty costs in the future.
- The discrepancy in Cable Condition
Defective cables generally include inflexibility of the transducer cable, discoloration, broken cables, or strain relief. In rare cases, damaged cables can cause electrocution in patients. As a result, the prominent cable issues effects reflect on the image namely Noise in the image, Artifacts, and Colour Artifacts in the image.
The probable cause of defective cables are system wheel run over the cable, improper storage of the cables without protective cases, breakage of strain relief due to bending, or dropping of the connector, wear and tear or prolonged usage of the cables.
Fixing the damage on the cables quickly saves the internal damages and thus, eradicates the harmful conditions of the patient. The solution varies from resoldering the cables, replacing the cables to even, replacement of the transducer in an attempt to resolve the color artifact image.
 Cable issue scanning images

Ultrasound probe cable issue

Ultrasound probe cable resoldering
6. Swelling of Matching Layer / Gel Issue
Swelling of the matching layer can be caused because of Improper gel and wrong sterilizing agents on the lens of the damaged probe. The cleaning gel or agent that enters into the probe tends to generally destroy the matching layer or acoustic array.
A damaged matching layer leads to shadows or dropouts in the image. A timely probe repair at the early detection stage can rectify such failures. In alignment with the gel issue, Immersing the ultrasound probe in more than accepted or recommended levels of gel as per the user manual damages the matching layer. The transducer replacement or lens replacement works best.

Probe Swelling of Matching Layer / Gel Issue
![]()
 Transducer replaced probe
- System Connector Issues
Repetitive insertions of the system connector assembly contribute to the breaking of the pins, knobs, and locking system. This failure can be resolved by repairing the system connector.
- Probe oil Leakage
Probe oil leakage is the most commonly found in 3D and 4D Ultrasound Transducers. The probe leakage can be evident that the oil in the probe soft shells shifts when turning the probe downwards facing and turning it up swiftly. As an effect, the image appears to be wavy or black. Then, it’s time to repair it.
- Multiplexer Issue Scanning Images
Multiplexers typically are situated in the side head or machine end side. Dual or Multiple images can arise when there is a failure in the multiplexer. The optimal solution for such a failure is the replacement of the multiplexer.

Multiplexer issue scanning images

Probe multiplexer replaced board
Preventive Measures:
Well, the next question that creates a meaningful thought on how to prevent our Ultrasound transducers from being defective, for a longer lifespan. Here’s a bunch of preventive measures for you to hop on.
- Involve in Regular inspection of the ultrasound transducer and its parts
- Clean the probe using the proper cleaning gels as per specified instructions before and after use.
- Necessary to keep the transducer cables off the floor.
- Keep the probe away from direct sunlight or excessive temperature changes or pressure.
- Make full utilization of the sterile probe covers when it is not in use.
Cleaning/Disinfecting the probes
- Wear Personal Protective Equipment (PPE) while disinfecting/ cleaning the ultrasound transducers.
- Disconnect the probe from the ultrasound system prior to cleaning.
- Preclean or wash the probe off the organic materials such as blood, bodily fluids, and residual sterile gel using the purified water with a single-use sponge.
- It is advisable not to use a brush as it damages the transducer.
- Wipe gently the probe with wipes containing Isopropyl alcohol (IPA) 70% to remove all the remaining organic matter.
- Dry the transducer surface using a clean soft cloth or gauze. Since ultrasound transducers are heat sensitive, avoid using heat to dry the probes. Dry the probes completely before storing them in order to avoid microbial growth.
- Confirm that the transducer shows no signs of deformation, damage, or peeling.
Lastly, many encounter confusions as to whether their defective ultrasound probe and parts needed to be replaced completely or repaired. When you don’t possess the knowledge of where to start and end in the case of rectifying the damages/defects in your ultrasound probe. Getting your defective ultrasound probes into the hands of reliable, approved servicing professionals is an absolute necessity.
